Developing Asterisk Voice Services
Introduction
This is what the Asterisk site says about it: “Asterisk is a free and open-source framework for building communications applications. Asterisk turns an ordinary computer into a communications server. Asterisk powers IP PBX systems, VoIP gateways, conference servers and is used by small businesses, large businesses, call centres, carriers and governments worldwide. "
A large number of Asterisk installations seem to be PBX (private branch exchange) related for small to medium companies and some commercial PBX solutions such as SwitchVox are customised Asterisk appliances with a user-friendly GUI. In this post, however, we’ll be looking at how to create IVR like voice services on top of Asterisk.
Installing Asterisk
The Asterisk Quick Start Guide describes the installation process but has one or two gotchas which I’ll point out here. First lets’s download the latest Asterisk version (11.0 LTS) and install it. (I’m using Ubuntu 12.10).
Execute the following as root:
cd /usr/src
sudo wget http://downloads.asterisk.org/pub/telephony/asterisk/asterisk-11-current.tar.gz
tar -zxvf asterisk-11-current.tar.gz
cd asterisk-11.3.0
The first gotcha is that, at time of writing, the latest “Quick Start Guide” downloads Asterisk 1.8.16 instead of the latest stable version 11.3
Next, we build Asterisk:
./configure
make
make install
That is it. Asterisk is now compiled and installed. Optionally, you can also run “make samples” at this point to generate a set of sample config files in /etc/asterisk but it’s not required.
Configuring Asterisk and a SIP client
Asterisk loads configuration files from the /etc/asterisk directory on Ubuntu. This directory will be empty if you did not install the Asterisk sample files. First, we need to load the required Asterisk modules. For development purposes, the easiest is to use autoloading to load all available Asterisk modules.
Create file /etc/asterisk/modules.conf using your favourite text editor (gedit is the easiest to use if you do not have a favourite):
[modules]
autoload=yes
Another gotcha - the Quick Start Guide loads a simple bare-bones set of modules instead of auto loading all in which case a lot of simple Asterisk scripts you may come across including our “hello world” sample below will not run.
Next, we’ll create two basic sip accounts by creating file /etc/asterisk/sip.conf:
[4001]
type=friend
host=dynamic
secret= pwd4001
context=demo

[4002]
type=friend
host=dynamic
secret= pwd4002
context=demo
And to allow these two extensions to call each other, we need to create file /etc/asterisk/extensions.conf:
[demo]
exten => 4001,1,Dial(SIP/4001)
exten => 4002,1,Dial(SIP/4002)
Finally, let’s set up a sip client. The Quick Start Guide suggests Xoiper which is not terribly easy to install and also, as I discovered the hard way, does not work on 64 bit Ubuntu. Instead, we’ll install linphone on our Asterisk server for simplicity:
sudo apt-get install linphone
Once linphone is installed, start it up and navigate to Options > Preference > Manage SIP Accounts and click the add button. Enter the details below:
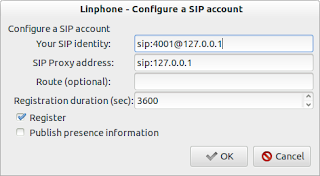
When you are prompted for a username and password enter “4001” and “pwd4001” respectively.
Next, start Asterisk:
asterisk -cvv
The -c option starts Asterisk in command line mode rather than daemon mode and allows us to see any output and error messages. The -vv parameter sets the verbosity level so that we can see some meaningful output to follow what the server is doing. To test that the server is running and configured correctly, dial your own extension in linphone which should be 4001. You should see a “User is busy” error message in linphone and something along these lines in the terminal that Asterisk is running in:
*CLI>   == Using SIP RTP CoS mark 5
  == Using SIP RTP CoS mark 5
  == Everyone is busy/congested at this time (1:1/0/0)
If you have access to a second Ubuntu machine, install linphone there using extension “4002” and password “pwd4002” and make sure that you use the IP of your Asterisk server instead of 127.0.0.1 as we did when we configure linphone on the Asterisk server above. Alternatively, you can try using MicroSIP on a Windows box instead. Then dial extension 4001 from 4002 or vice versa.
If you do not have a second PC available, fear not, the ubiquitous “hello world” sample is coming up next…
Hello world
The Asterisk installation comes with several prerecorded voice files by Allison Smith “the voice of Asterisk”. You can find these voice files in /var/lib/asterisk/sounds/en and fortunately for us, it includes “Hello world” voiced by Allison herself.
For our hello world sample we want to be able to dial some extension, say 101, have Asterisk answer, play the “hello world” voice file and then hang up. It turns out to be surprisingly simple with Dialplan, Asterisk’s scripting language - at the bottom of /etc/asterisk/extensions.conf add the following three lines:
exten => 101,1,Answer()
same => n,Playback(hello-world)
same => n,Hangup()
Now you should be able to dial 101 on linphone and hear Allison greeting you with “Hello world”.
More samples
Now that we have the obligatory “hello world” out of the way let’s get a little more adventurous with Dialplan.
Echo Test
The Echo app simple echos sound that it receives back to the caller. Asterisk includes voice files explaining how to use Echo so we can simply play those before and after the Echo as appropriate and have this service run on extension 102 by adding the following at the bottom of extensions.conf:
exten => 102,1,Answer()
   same => n,Playback(welcome)
   same => n,Playback(demo-echotest)
   same => n,Echo()
   same => n,Playback(demo-echodone)
   same => n,Playback(vm-goodbye)
   same => n,Hangup()
Say caller’s extension
SayAlpha() plays every letter and number of a string individually and the ${CALLERID(num)} variable contains the extension of the caller. We combine the two so that dialing extension 103 tells us what the extension is that we’re calling from:
exten => 103,1,Answer()
   same => n,SayAlpha(${CALLERID(num)})
Text to Speech
Next, let’s try running a simple text to speech script on extension 104. The Festival() Dialplan command uses the Linux text to speech utility “Festival” to translate text to speech. Festival is not the best text to speech package available, but it’s free and it works. To use it, we need to make sure that Festival is installed and running in server mode on our Asterisk server before starting Asterisk (if Asterisk is running, stop and restart it):
sudo apt-get install festival
sudo festival --server
We also need to configure Asterisk to know that festival is running locally on the default port. Create /etc/asterisk/festival.conf as follows:
[general]
host=localhost
port=1314
Finally we modify extensions.conf with the dialplan script to have Festival read out text to us on extension 104:
exten => 104,1,Answer()
   same => n,Festival('The quick brown fox jumps over the lazy dog')
   same => n,Festival('Good bye')
   same => n,Hangup()
Of course, it doesn’t make much sense to generate text to speech on the fly like this when we can just as easily do it once off and save as a voice file that can be played back, but it makes for a more readable sample.
A Simple IVR Script
To develop a simple IVR we need to understand a few more Dialplan concepts. The Goto command can be used to redirect to an extension. For our basic IVR script, we will use ‘fake’ extensions corresponding to an option selected by the caller. In the script below, Extension 1 will contain the script to be executed when the caller presses the 1 key and similarly extension 2 will correspond to the caller pressing the 2 key. The WaitExten command waits until the user presses a key.
We will also put most of the IVR script in its own section (or context in Asterisk terminology) called “demo-menu” in this case so that our fake IVR extensions do not mix with extension that can be assigned to users. Below is the Dialplan script for our very simple IVR running on extension 105:
; This goes under the "demo" context with all the other script above
; When dialling 105, redirect the start of the demo-menu context
exten => 105,1,Goto(demo-menu,s,1)

;The demo-menu context
[demo-menu]

;The start. Answer the call.
exten => s,1,Answer(500)
   ; Continuously loop. Say something then wait for extension.
   same => n(loop),Festival('Press 1 or press 2')
   same => n,WaitExten()

; Fake extension 1 gets invoked if the user dialled 1.
exten => 1,1,Festival('You entered number 1')
   ; Go back to the start of this context.
   same => n,Goto(s,loop)

; Fake extension 2 gets invoked if the user dialled 2.
exten => 2,1,Festival('You entered number 2')
   ; Go back to the start of this context.
   same => n,Goto(s,loop)
Conclusion
The above code works well with our standalone Asterisk server with a SIP phone or two connected but in the real world, you’d want to hook this up to the public phone system. This can be achieved by setting up a trunk between you PBX (or your local phone network operator) and the Asterisk server. While such configuration can be tricky, once it’s done creating additional voice services will be fairly straight forward. If your PBX supports SIP or some other VoIP protocol, no additional hardware is needed. If you want to interface with a telephony network, you will need a telephony interface card to connect a E1/T1 line to, but Asterisk supports that configuration too.