Microservices with Spring Boot and Kubernetes: Getting Started with Minikube
Introduction
This is (hopefully) the first in a series of posts detailing my adventures with Spring Boot microservices on Kubernetes. My focus will be mostly on architecting, developing, monitoring, and maintaining microservices on Kubernetes and not so much on the administration or InfraOps challenges of maintaining a Kubernetes cluster. You shouldn’t be maintaining your own production Kubernetes cluster anyway - OpenShift is a great option for an on-premise cluster, and AWS, Google and Azure, along with many others, have great public cloud Kubernetes-based container platforms available.
For my purposes, running a local Minikube-based single-node Kubernetes cluster on my desktop should be sufficient for some R&D and proof of concepts. As a start, this post covers the basics of getting started with developing for Kubernetes using Minikube.
I started installing Minikube directly on Windows, but that process wasn’t nearly as smooth as it should have been. It didn’t take long to switch over to a Linux VM instead and that process was far smoother.
Prerequisites
The following prerequisites are needed:
- Minikube
- Kubectl
- Docker
- (Optionally) VirtualBox Hypervisor
The Hypervisor is optional. If you want to avoid the unnecessary overhead and inefficiency of running Minikube on a VM inside another VM, you can run Minikube using the docker driver - which is what I did below. This is a good install guide for the above prerequisites.
Start Minikube
First, let’s start up minikube with: minikube start –driver=docker
elroy@elroy-vm:~$ minikube start --driver=docker
😄  minikube v1.11.0 on Linuxmint 19.3
✨  Using the docker driver based on user configuration
👍  Starting control plane node minikube in cluster minikube
🔥  Creating docker container (CPUs=2, Memory=2200MB) ...
🐳  Preparing Kubernetes v1.18.3 on Docker 19.03.2 ...
    ▪ kubeadm.pod-network-cidr=10.244.0.0/16
🔎  Verifying Kubernetes components...
🌟  Enabled addons: default-storageclass, storage-provisioner
🏄  Done! kubectl is now configured to use "minikube"
And let’s make sure our Kubernetes Dashboard is available:
minikube dashboard
This should open up minikube’s Kubernetes dashboard in your default browser:
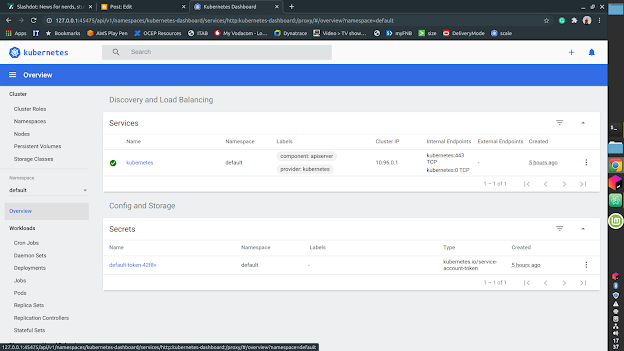
Keep the dashboard open, it will refresh automatically as we deploy to minikube.
Deploying an image
Now let’s deploy a docker image to Kubernetes. We’ll use the nginxdemos/hello NGINX image from Dockerhub and confirm that the deployment is ready and the pod is created:
elroy@elroy-vm:~$ kubectl create deployment hello-world --image=nginxdemos/hello
deployment.apps/hello-world created

elroy@elroy-vm:~$ kubectl get deployments
NAME          READY   UP-TO-DATE   AVAILABLE   AGE
hello-world   1/1     1            1           7s

elroy@elroy-vm:~$ kubectl get pods
NAME                           READY   STATUS    RESTARTS   AGE
hello-world-86f6499d79-hcjcd   1/1     Running   0          16
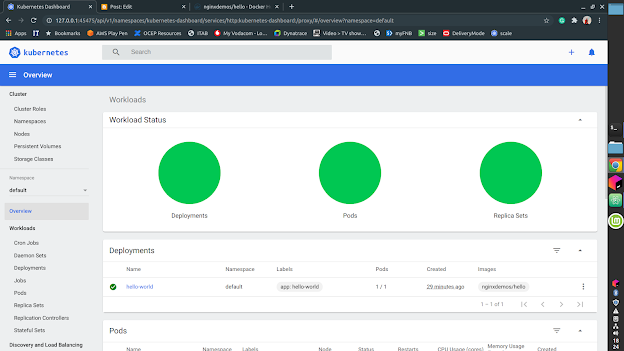
You should also see the dashboard updating showing a new deployment pod and Replica Set.
To get a terminal on this running pod we can use:
kubectl exec --stdin --tty hello-world-86f6499d79-84xmr -- /bin/sh
Next, let’s expose the NGINX pod as a service and get a browser connection to the service:
elroy@elroy-vm:~$ kubectl expose deployment hello-world --type=NodePort --port=80
service/hello-world exposed

elroy@elroy-vm:~$ minikube service hello-world
|-----------|-------------|-------------|-------------------------|
| NAMESPACE |    NAME     | TARGET PORT |           URL           |
|-----------|-------------|-------------|-------------------------|
| default   | hello-world |          80 | http://172.17.0.3:31354 |
|-----------|-------------|-------------|-------------------------|
🎉  Opening service default/hello-world in default browser...
Opening in existing browser session.
You should now see that NGINX default page in your browser.
Scaling the service
Currently, we’re running a single instance of an NGINX webserver a single pod. One of the main reasons to use Kubernetes is that it manages scaling of pods for us and makes it easy to run multiple instances. So let’s scale to 10 instances of the webserver:
elroy@elroy-vm:~$ kubectl scale deployment hello-world --replicas=10
deployment.apps/hello-world scaled

elroy@elroy-vm:~$ kubectl get deployments
NAME          READY   UP-TO-DATE   AVAILABLE   AGE
hello-world   2/10    10           2           101m

elroy@elroy-vm:~$ kubectl get pods
NAME                           READY   STATUS              RESTARTS   AGE
hello-world-86f6499d79-6z6rz   0/1     ContainerCreating   0          23s
hello-world-86f6499d79-9fg97   0/1     ContainerCreating   0          23s
hello-world-86f6499d79-dqwns   1/1     Running             0          23s
hello-world-86f6499d79-grcxd   0/1     ContainerCreating   0          23s
hello-world-86f6499d79-hcjcd   1/1     Running             0          101m
hello-world-86f6499d79-j7wbc   0/1     ContainerCreating   0          23s
hello-world-86f6499d79-r5m6j   1/1     Running             0          23s
hello-world-86f6499d79-r72mt   1/1     Running             0          23s
hello-world-86f6499d79-vwsrw   0/1     ContainerCreating   0          23s
hello-world-86f6499d79-z6jqq   1/1     Running             0          23s
If we’re quick enough with the above, we can see the pods starting up in a “ContainerCreating” stage before they are available in the “Running” state.
Creating a load balancing ingress
Lastly, we want to expose the service above via an ingress so that we access our service via a static URL and not have to rely on the “minikube service” command to access the service. First, let’s enable ingress on minikube and check that it’s started (it may take a good few seconds):
elroy@elroy-vm:~$ minikube addons enable ingress

🌟  The 'ingress' addon is enabled


elroy@elroy-vm:~$ kubectl get pods -n kube-system
NAME                                        READY   STATUS      RESTARTS   AGE
coredns-66bff467f8-65x2t                    1/1     Running     0          9h
coredns-66bff467f8-hj6qg                    1/1     Running     0          9h
etcd-minikube                               1/1     Running     0          9h
ingress-nginx-admission-create-wqs4t        0/1     Completed   0          57s
ingress-nginx-admission-patch-554qg         0/1     Completed   0          57s
ingress-nginx-controller-7bb4c67d67-8bq4l   1/1     Running     0          57s
kube-apiserver-minikube                     1/1     Running     0          9h
kube-controller-manager-minikube            1/1     Running     0          9h
kube-proxy-wrhkh                            1/1     Running     0          9h
kube-scheduler-minikube                     1/1     Running     1          9h
storage-provisioner                         1/1     Running     1          9h
We want to see the ingress-nginx-controller in a ‘Running’ state before proceeding. In my case, it took just about a minute to start. Now let’s get the local IP address of our Kubernetes cluster:
elroy@elroy-vm:~$ minikube ip
172.17.0.3
Armed with the ip address, we can not add it to our /etc/hosts file and give it a name. I used ‘cluster.local’. With this info we can now create an ingress yaml file:
apiVersion: networking.k8s.io/v1beta1
kind: Ingress
metadata:
 name: hello-world
spec:
 rules:
 - host: cluster.local
   http:
     paths:
     - path: /
       backend:
         serviceName: hello-world
         servicePort: 80
Let’s apply this ingress:
elroy@elroy-vm:~$ kubectl apply -f ingress.yaml
ingress.networking.k8s.io/hello-ingress created
Now we can access our exposed service through the browser via http://cluster.local or even https://cluster.local (just ignore the self-signed certificate). This particular NGINX demo reports the hostname that it is running on on its default page, so if you refresh your browser a few times you should see the hostname changing, corresponding to one of the 10 pods you have running.
Conclusion
It’s pretty easy to get started with Kubernetes using minikube to run a local, single-node cluster. Because it was not quite a trivial exercise for me to put this together I thought I’d share these first few setup sets before getting into more interesting topics. The main lesson learnt: I don’t recommend going down the rabbit hole of trying to get this running on my Windows laptop without using a VM (it can ve done but, for me at least, was not work the pain).